Washes & Techniques
Wet-on-Wet Watercolor: Soft Blends for Beginners
Learn wet on wet watercolor with this beginner-friendly step-by-step guide to creating dreamy soft blends, skies, and feathered edges.
Wet-on-wet is the technique that gives watercolor its dreamy, signature look: colors that melt into each other, soft edges that fade into nothing, skies that glow. If you have ever wondered how painters get those impossible gradients, this is the answer. It is also one of the first things worth learning, because it is more forgiving than it looks.
The idea is simple. You wet the paper first, then drop color into the damp surface. The paint spreads and blooms on its own. You are mostly guiding it rather than controlling it, which is a different mindset from how most people expect painting to work.
What wet-on-wet actually means
Watercolor technique breaks into two broad categories. Wet-on-dry means painting onto dry paper, which gives you crisp, hard edges. Wet-on-dry is great for detail work and clean shapes, but it does not blend colors softly on its own.
Wet-on-wet (also called wet-in-wet) means you pre-wet the paper with plain water, then add pigment while the surface is still damp. Because the paper is wet, the paint flows freely and the edges stay soft. Colors placed near each other migrate and merge without any brushwork on your part.
The key variable is timing. A very wet surface lets paint travel far and fast. As the paper dries toward just-damp, paint moves less and you get more control. Once the surface has a matte look rather than a sheen, wet-on-wet is over and you are back to wet-on-dry. Learning to read that window is the real skill.
What you need before you start
You do not need much, but the materials matter more here than in most watercolor techniques. Thin paper buckles badly when wet, and a buckled surface pools water in the low spots, which ruins the blend.
- Paper: 140 lb (300 gsm) cold-press watercolor paper. This is the minimum weight for wet-on-wet without excessive buckling. Arches, Fabriano Artistico, and Canson Montval all work fine for beginners.
- Brushes: A size 10 round for laying the initial water layer, a size 6 or 8 round for dropping in color. A 1-inch flat brush is useful for wetting large areas quickly.
- Two water jars: One for rinsing, one for clean water. This matters more in wet-on-wet than almost anywhere else.
- Paint: Student or artist grade, whatever you have. Softer pigments like ultramarine blue, raw sienna, and quinacridone rose blend beautifully. Phthalo blue moves aggressively on a wet surface, so use it sparingly until you know it.
- A spray bottle (optional but helpful): A fine mist can extend the wet window if the paper starts drying too fast.
You can also tape your paper to a board with painter's tape on all four sides. The tape keeps the sheet from warping as badly, and the border it leaves looks tidy when you peel it off.
Step-by-step: your first wet-on-wet blend
This exercise takes about 15 minutes and teaches you the feel of the technique before you worry about painting anything specific.
- Tear or cut a half-sheet of watercolor paper (roughly 7 x 10 inches). Tape it to a board if you have tape.
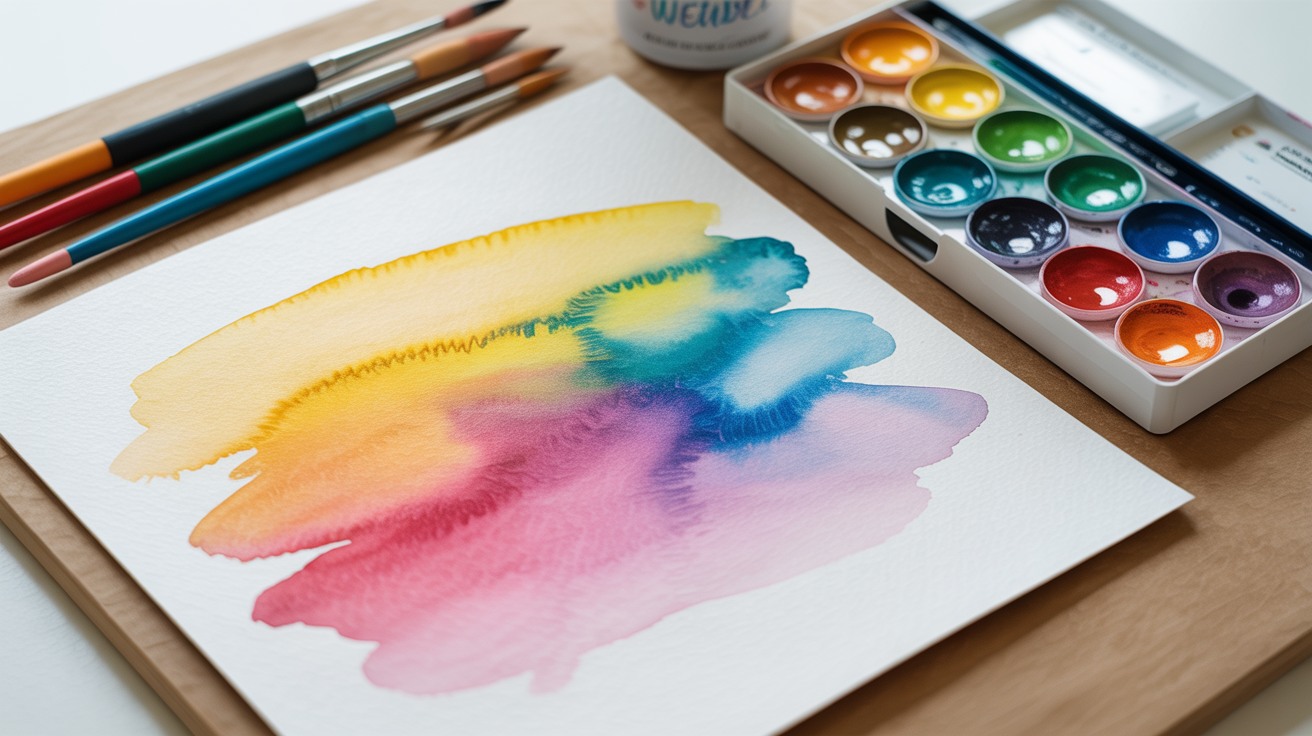
- Load your large brush with clean water. Wet the entire paper surface with even strokes, going horizontal then vertical. You want a uniform sheen with no dry patches. Hold the board up to the light and check: any matte spots will resist the paint.
- Mix two colors separately while the paper absorbs. Make each mix fairly strong, at least a coffee consistency (more pigment than water). Wet-on-wet dilutes your color more than you expect because the paper is already holding water. What looks bold in the dish often dries soft and pale.
- Drop color onto the wet surface with your smaller brush. Touch the tip to the paper and let the paint flow in. Do not scrub or push it around. You can tilt the board slightly to encourage the paint to run in a direction.
- Bring a second color nearby. Leave a small gap between them, or let them just touch. Watch what happens. The colors will migrate toward each other and create a soft transition zone you did not have to paint.
- Put your brush down and wait. This is the hardest part. The more you touch the surface while it is wet, the more you disturb the bloom. Trust the water to do the work.
- Let it dry completely before evaluating. Watercolor dries 20 to 30 percent lighter than it looks when wet. The soft blend you see while it is damp will become even softer and more luminous once dry.
Practice this on scrap paper several times before you try it in a finished piece. The goal is to feel when the paper is wet enough, and when it is too dry to add more color safely.
Reading the drying window
This is where most beginners struggle. Wet-on-wet has roughly three stages, and knowing which one you are in changes what you can do.
| Stage | Paper look | Paint behavior | What to do |
|---|---|---|---|
| Very wet | Mirror sheen | Paint runs freely, blooms wide | Drop color, tilt board, stand back |
| Medium wet | Soft sheen | Paint moves but stays closer to where you place it | Add details, second colors |
| Nearly dry | Matte surface | Paint barely moves, hard edges start forming | Stop. Adding paint now creates "cauliflowers" |
A cauliflower (also called a bloom or backrun) happens when you drop wetter paint onto a surface that is starting to dry. The water pushes the drying pigment outward and leaves a ruffled, uneven edge. Beginners hate this. Experienced painters often seek it out deliberately. If you get one by accident, just leave it and let the area dry completely before deciding whether to fix it.
If you want to work wet-on-wet for longer, you can re-wet the paper before it fully dries by misting it lightly with a spray bottle or applying a fresh layer of clean water with a soft brush. Be gentle so you do not disturb pigment that has already settled.
Practical exercises to build the skill
The best way to get comfortable with wet-on-wet is to paint things that genuinely call for soft edges, because then you have a reason to care about the result.
Simple sky gradient. Pre-wet the paper and lay ultramarine blue at the top, letting it fade toward clean water as you move down. This teaches you how to grade from full color to nothing. It is essentially the same motion as painting a smooth graded wash, but the wet paper makes the transition even softer.
Sunset colors. Wet the paper, then drop quinacridone rose at the horizon and ultramarine or payne's grey toward the top. Let them mix in the middle on their own. You will get a purple transition zone you did not mix on the palette.
Simple clouds. Wet the paper, lay a pale blue across the sky area, then use a clean damp brush (barely any water) to lift out soft cloud shapes while the paint is still wet. The lifted area stays light and the edges stay soft because the paper is still damp.
Background foliage. Wet a roughly leaf-shaped area, then drop in sap green, raw sienna, and a touch of burnt sienna. Let them merge. This kind of loose background reads as lush greenery without requiring any detail.
For each exercise, do three repetitions on scrap paper before doing it in a "real" painting. Three tries teaches you the timing far better than reading about it.
Combining wet-on-wet with dry layers
Wet-on-wet is almost never the only technique in a painting. The soft background it creates is a perfect foundation for sharper detail added later on dry paper.
A common approach: lay a wet-on-wet wash for the background (sky, distant hills, water). Let it dry completely. Then paint the foreground elements with wet-on-dry for crisp, readable shapes. The contrast between soft background and hard foreground edges gives the painting depth.
A solid flat wash is a good technique to know alongside wet-on-wet, because sometimes you want a smooth, even background rather than a blended one. The choice between them depends on what you are painting and how much movement you want.
The main rule: let each wet-on-wet layer dry fully before adding anything on top. If you paint over a damp area, the new paint will pick up and disturb the layer underneath. Patience matters more in watercolor than in almost any other medium.
Frequently asked questions
Why does my wet-on-wet blend look muddy?
Muddy results usually come from mixing too many colors that cancel each other out. Ultramarine and burnt sienna mix to a beautiful neutral gray. Ultramarine and cadmium yellow make green. But pile in three or four colors that span the color wheel and they will average out to brown. Start with two colors per wet-on-wet session until you know how they behave together.
How wet does the paper need to be?
Wet enough that you can see an even sheen across the whole surface when you hold it at an angle to the light. If you see dull patches, add more water there. If water is pooling in visible drops, dab off the excess with a dry brush or tissue. You want the paper saturated but not flooded.
Can I use wet-on-wet with pans instead of tubes?
Yes. The technique does not depend on the paint format. The difference is that pan paint often needs more work to get to a strong consistency, and you need enough pigment on the brush to show up against the wet paper. Load your brush generously. Thin, pale pan washes tend to disappear entirely on a wet surface.
What do I do if the paper dries before I finish?
Let it dry completely, then re-wet it and continue. Trying to add color to a half-dry surface is what causes cauliflowers and hard edges. A full, even re-wetting resets the surface almost as well as starting fresh. The first layer of color will stay in place and the new wet layer will sit on top.
Why do my colors look so pale once dry?
Watercolor loses 20 to 30 percent of its apparent value as it dries, and wet-on-wet amplifies this because the paper itself is diluting your paint. The fix is to mix your colors significantly darker and more saturated than you think you need. Do a test swatch, let it dry, and compare. After a few sessions you will naturally compensate without thinking about it.