Washes & Techniques
How to Use Salt, Splatter, and Other Easy Watercolor Effects
Learn the watercolor salt technique, splatter, and other texture effects that add life to your paintings without complicated skills.
Some of the most striking textures in watercolor come from the simplest interventions. Salt dropped onto wet paint, water flicked from a loaded brush, crumpled plastic wrap pressed into a glaze: none of these require fine motor control or years of practice. What they require is timing and a willingness to let the materials do the work. This guide walks through several easy watercolor texture effects, when to use them, and the small things that make the difference between results you like and results that just look muddy.
The Watercolor Salt Technique
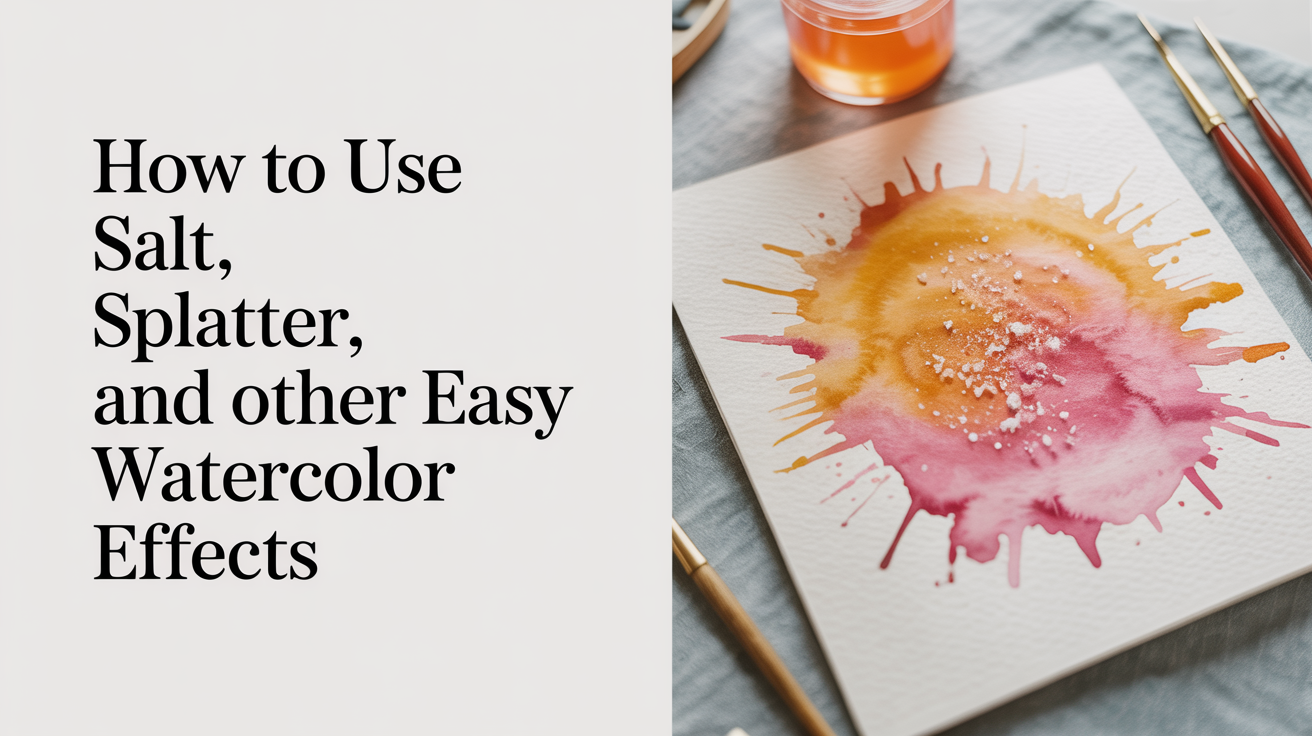
Salt is probably the most popular texture effect in watercolor, and for good reason: the results can look like snowflakes, sea foam, lichen, or distant stars depending on the paper, paint, and timing.
How it works
Salt crystals absorb water and pigment from the surrounding area as the paint dries. This pulls pigment toward each crystal and leaves a bloom-shaped light mark. The exact shape depends on the size of the salt: table salt makes tight, fine clusters; kosher salt makes larger, more dramatic bursts; rock salt makes coarse, uneven shapes that work well for granite or rugged stone textures.
Timing is everything
The watercolor salt technique only works within a specific window. If the paint is too wet, the salt dissolves completely and does nothing useful. If it is too dry, the paint has already set and the salt cannot displace it. You want the paper to have lost its mirror shine but still look damp. At that stage, sprinkle the salt and leave it completely alone. Do not blow on it, tilt the board, or touch the paint.
Wait until the paint is fully dry before brushing off the salt crystals with a dry cloth or soft brush. Lifting them while the paint is still wet smears the marks.
What to paint with salt
- Night skies and galaxies
- Snow-covered ground or rooftops
- Sea foam and breaking waves
- Lichen on rocks
- Wildflower meadows seen from a distance
Salt works best with granulating pigments (ultramarine, burnt sienna, viridian) because these pigments already tend to cluster in the paper's texture and the salt amplifies that behavior. Transparent non-granulating pigments like Hansa yellow or quinacridone rose still respond, but the marks are softer.
Splatter and Spatter
Watercolor splatter adds energy and randomness that is hard to fake with a brush. It suits loose landscapes, wildflower paintings, and abstract pieces.
Two basic methods
Brush tap: Load a round or hake brush with diluted paint and tap the handle firmly against your other hand held above the paper. This produces larger drops that spread on impact.
Thumb flick: Load a stiff brush (a toothbrush works well), hold it bristles-down over the paper, and run your thumb across the bristles toward you. This produces fine mist-like spatter. The further away from the paper you hold the brush, the finer and more spread out the marks become.
Controlling the mess
Splatter is harder to aim than people expect. Cover any area you want to protect with a piece of scrap paper or low-tack masking tape before you start. Do a test on scrap paper first to check the size of the drops and the water-to-paint ratio, because overly watery spatter spreads into shapeless blobs while spatter that is too thick sits on the surface and looks like mud.
Spatter works best on dry paper if you want crisp dots, or on damp paper if you want the dots to bloom softly into the background. The latter gives a more atmospheric look and suits misty landscapes.
Plastic Wrap Texture
Pressing crumpled plastic wrap (cling film) onto a wet glaze creates organic, crystalline shapes that look like cracked ice, broken stone, or abstract foliage. The technique is almost entirely hands-off once the wrap is down.
Apply a generous wash of paint, then immediately lay a crumpled sheet of plastic wrap loosely across the wet surface. Do not flatten it. Leave it in place until the paint is completely dry, then peel it away slowly. The ridges and folds of the plastic trap pools of pigment and leave behind branching lines and irregular patches.
The results vary a great deal depending on how loose the plastic is, how wet the paint was, and whether the painting is flat or slightly tilted. That unpredictability is the point: use this technique for backgrounds and secondary areas where you want texture without having to control every mark.
Wet-into-Wet Blooms
A backrun, sometimes called a bloom or cauliflower, forms when a drop of water or very wet paint lands in an area that is damp but no longer fully wet. The wetter liquid pushes the drying paint outward and leaves a ragged, flower-like edge.
Backruns are usually considered mistakes, but they can be used intentionally to add texture. To make a deliberate bloom, lay a wash and wait until it loses its shine, then drop a single brushstroke of clear water or a slightly different color into the damp area. The liquid will push out and form a feathered edge.
This technique pairs naturally with the kind of wet-in-wet work covered in wet-on-wet watercolor soft blends for beginners. Understanding how much moisture is already on the paper is the skill that connects all of these effects.
Layering Texture Effects with Washes
Texture effects work best when they are considered as part of the overall painting process, not added at the end as an afterthought.
A typical approach:
- Lay your initial flat or graded wash to establish the overall color field. If you need a refresher on this, how to paint a flat wash in watercolor step by step and how to paint a smooth graded wash both cover the core technique.
- While the wash is still at the right dampness, apply salt or plastic wrap if you want those effects in the base layer.
- Let the paint dry fully and brush off any salt.
- Add a second glaze for shadows or definition.
- Use spatter last, after the main shapes are established, as a finishing detail.
Working in this order keeps the texture from overwhelming the composition. Texture is most effective when it supports a clear focal point rather than covering the whole surface uniformly.
Quick Reference: Timing and Paper Conditions
| Effect | Best paper condition | Wait before touching |
|---|---|---|
| Salt | Damp, no mirror shine | Until fully dry |
| Plastic wrap | Very wet | Until fully dry |
| Spatter (crisp dots) | Dry | Immediate |
| Spatter (soft blooms) | Damp | Until fully dry |
| Deliberate backrun | Damp, losing shine | Until fully dry |
Frequently Asked Questions
Does the type of salt matter? Yes. Table salt makes small, dense marks. Kosher salt gives medium-sized bursts with more white space. Rock or sea salt makes large, coarse shapes. Start with table salt on a scrap piece of paper to understand the basic effect, then experiment with coarser types for more dramatic results.
My salt is not doing anything. What went wrong? The two most common causes are applying salt too early (paint still has a mirror shine and the salt just dissolves) or too late (paint has already set). The window is when the surface looks damp but no longer reflects light. Humidity and paper type both affect how long that window lasts, so it takes a few practice runs to read it reliably.
Can I use these effects on any watercolor paper? Salt and spatter work on any weight of cotton or wood-pulp paper, but the results are cleaner on 100% cotton sheets because the surface is more consistent. Very cheap paper tends to absorb unevenly, which makes the salt marks blotchy rather than sharp. Cold-press paper gives more texture to work with than hot-press, which makes salt effects especially visible.
Will these techniques work with student-grade paints? They will work, but the effects are less defined. Student paints contain more fillers and less pigment, so the salt and plastic wrap have less color to displace. The marks appear but tend to be faint. Artist-grade paints with strong pigment concentrations give more dramatic and distinct results.
How do I keep spatter off areas I want to stay clean? The most reliable method is a piece of scrap paper held or taped over the protected area. Low-tack masking tape works too, but test it on a scrap first to make sure it will not lift the paint when you peel it. For very detailed work, masking fluid applied to the area before the spatter pass gives the most precise protection.