Getting Started
How to Set Up a Simple Watercolor Workspace at Home
Learn how to create a practical watercolor workspace setup at home with the right surface, lighting, and supplies within easy reach.
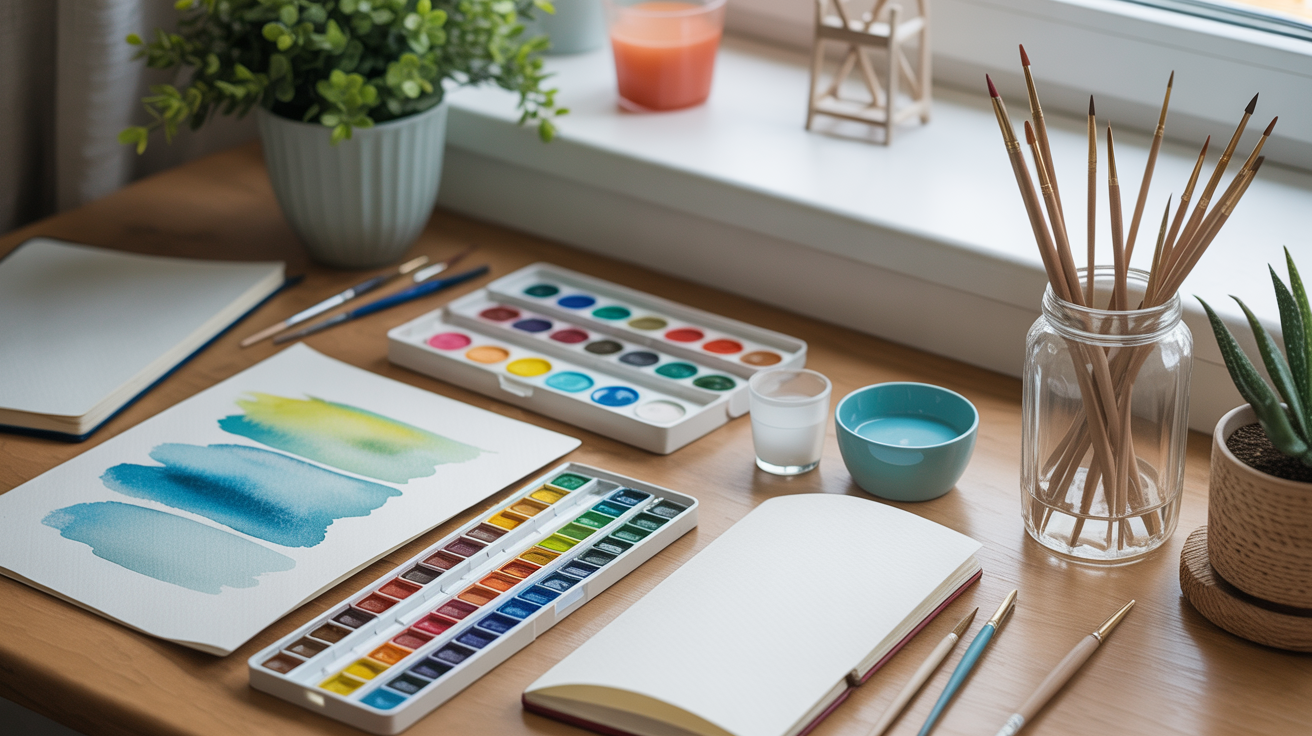
You don't need a studio, a spare room, or a professional drafting table to paint watercolor at home. A kitchen table, a window, and a handful of supplies will do just fine. What matters is that your setup is comfortable, organised enough to keep you from hunting for a brush mid-session, and positioned so your paper tilts at the right angle. This guide walks you through exactly that.
Choosing where to paint
The single most important thing your watercolor desk setup needs is good light. Natural light from a north-facing or east-facing window is ideal because it's consistent and doesn't cast harsh shadows. If you only have south- or west-facing windows, that's still workable, just paint in the morning before direct sun hits.
Artificial light works too. A daylight LED bulb (look for 5000-6500K on the packaging) gives a neutral white light that won't skew your colour mixing. Warm yellowish bulbs make blues look muddier than they are and will throw off your palette decisions, so avoid those.
Beyond light, think about water access. Watercolor requires two jars of water that you'll be refilling and swirling constantly. Painting in the kitchen is genuinely convenient for this reason. If you set up in a living room or bedroom, keep a large bottle nearby so you're not trekking to the sink every ten minutes.
Floor and furniture protection
Watercolor is water-based and relatively forgiving, but spills happen. A cheap vinyl tablecloth under your supplies takes the anxiety out of the whole session. If you're working on a wooden floor, a small mat underneath your chair doesn't hurt either.
Setting up your surface and tilt
Flat watercolor paper curls as it gets wet. Painting on a slight tilt (10 to 15 degrees) lets gravity help your washes flow downward in a controlled way and stops paint from pooling unpredictably at the centre of your paper.
The simplest solution is a wooden board, a piece of thick plywood, or even a large hardcover book propped at the back edge by another book. You can also buy an inexpensive tabletop easel, though that's not strictly necessary at first.
For stretching or taping paper: if you're using 140 lb (300 gsm) cold-press paper, it will warp less than lighter sheets, but it will still move a little. Tape the edges to your board with painter's tape (low-tack masking tape) before you start. That keeps the paper from buckling badly as it absorbs water and gives you a clean white border when you pull the tape off at the end.
Organising your supplies within reach
A disorganised watercolor painting setup slows you down at exactly the wrong moment. When a wet wash needs a second color before it dries, you don't want to be searching for a brush.
Here's a practical layout:
- Water jars: two jars, one for rinsing brushes and one kept clean for mixing. Place them to your non-dominant side so you won't knock them with your painting hand.
- Palette: directly in front of you or slightly to your dominant side. Leave the center wells empty for mixing; put your pigments around the outer ring.
- Brushes: lay them flat (never bristles-down in a jar, which crushes the tip) on a folded cloth to your dominant side.
- Paper towels or a scrap of cloth: close by for blotting brushes. You'll use this constantly.
- Reference: phone, tablet, or printed photo propped up at eye level so you're not craning your neck down to check it.
Your actual painting board goes in the centre, on a slight tilt as described above.
What goes in your palette and how to set it up
If you're using tube paints, squeeze small amounts into the wells of your palette and let them dry slightly before you start. Dried tube paint reactivates quickly with a damp brush, and this keeps colours from bleeding into each other while you work.
A beginner palette with seven to nine pigments covers most subjects:
| Pigment | Notes |
|---|---|
| Ultramarine blue | Granulating, slightly warm blue, great for skies and shadows |
| Phthalo blue | Intense, transparent, use sparingly |
| Burnt sienna | Warm earthy orange-brown, mixes neutrals with ultramarine |
| Raw sienna | Lighter, golden earthy tone |
| Yellow ochre | Muted yellow, good for landscapes |
| Quinacridone rose | Transparent, vivid warm pink |
| Hansa yellow (or cadmium yellow hue) | Clean primary yellow |
| Sap green | Pre-mixed green, useful but mix your own for variety |
| Payne's grey | Near-black for darks and toning colours |
Leave space in the centre of the palette for mixing. The common beginner mistake is cramming pigments into every well with no room to mix, then wondering why colours look muddy. Give yourself at least four or five open mixing areas.
For pan paints, the same logic applies: keep the pans around the perimeter, leave the centre of a large mixing palette free. See the 5 things you actually need for your first watercolor painting for more on choosing between tubes and pans when you're just starting out.
Lighting your workspace properly
We touched on light source briefly, but it deserves a little more attention because it directly affects how you mix colour.
If your light source is to one side, you might be painting shadows on your palette without realising it. Try to position your light so it comes from above and slightly in front of you, or from the side opposite your painting hand. Shadows falling across your palette make it genuinely hard to judge how dark a colour is before you put it on paper.
One practical test: dip a brush in a colour you've mixed, dab it on a scrap piece of paper, and hold the scrap up near the light. If the colour looks different on the scrap than it did in the palette, your palette is in shadow and you need to reposition your light.
Also worth knowing: watercolor dries 20 to 30 percent lighter than it looks when wet. This isn't a lighting problem, it's just how the medium works. You'll calibrate for it naturally after a few sessions, but it's useful to know so you don't panic when your first wash looks washed out after drying.
Keeping a small practice scrap nearby
This is one of those habits that separates a frustrating session from a productive one. Keep a scrap piece of the same paper you're painting on to the side of your board. Before you put any colour on your actual painting, test it on the scrap first. Check the consistency (is it tea or coffee strength?), check the colour, check how wet your brush is.
This one habit prevents probably half of all "I ruined it" moments. If a colour is too dark or too wet, you catch it on the scrap, not on the painting. For more on managing water ratios before you put brush to paper, how much water to use in watercolor goes into this in detail.
Even experienced painters do this. It takes three seconds and saves a lot of grief.
Frequently asked questions
Does my workspace need to be a dedicated art space?
No, not at all. Most beginner watercolor painters work at a kitchen table, dining table, or desk that also serves other purposes. You just need to be able to wipe it down, protect the surface with a tablecloth or mat, and have access to water nearby. A dedicated space is nice if you eventually want to leave a painting mid-session and come back to it, but it's nowhere near a requirement to start.
Can I paint watercolor on a completely flat surface?
You can, but you'll get more pooling and unpredictable hard edges as water collects in low spots on the paper. A slight tilt of around 10 to 15 degrees gives you more control over where washes go. That said, some techniques like wet-on-wet actually work better on a flatter surface so the paint spreads evenly in all directions. It's worth experimenting with both.
How much room do I actually need?
Less than you think. A space about 60 cm wide and 45 cm deep is enough for a half-sheet of watercolor paper, two water jars, and a palette. The main constraint is that you want elbow room to move your brush arm freely without knocking a water jar. If you're tight on space, work on quarter-sheets (about A4 size) which are a great format for practice anyway.
Do I need a drafting table or easel?
Not to start. A board propped up at the back by a book or a small wedge works perfectly well and costs nothing. A tabletop easel (the kind with an adjustable tilt) is a nice upgrade if you find yourself painting regularly, but it's not something to spend money on in the first few weeks. Get the basics working first, then see what feels uncomfortable about your setup before buying anything.
What if I don't have good natural light?
A daylight LED desk lamp solves this almost completely. Look for one rated at 5000K or above, which mimics natural white light. Position it above and slightly in front of your workspace so it illuminates your palette and paper evenly without glare. If you want a starting point for what to buy and set up before your first painting session, watercolor for absolute beginners: how to start in one afternoon covers the full first-session setup from scratch.