Light, Value & Composition
How to Paint Believable Shadows in Watercolor
Learn how to paint believable shadows in watercolor using color, value, and edge control, practical tips for beginners.
Shadows are one of those things that look complicated but follow a handful of consistent rules. Once you understand what makes a shadow read as a shadow, rather than a muddy smear, painting them becomes much more straightforward. This guide walks through the logic behind watercolor shadows, how to mix believable shadow colors, and how to place them so your subjects start to look three-dimensional.
Why Shadows Look Wrong (and the Fix)
The most common mistake beginners make with watercolor shadows is reaching for brown, grey, or black and painting a dark shape beside the object. The result looks flat because real shadows are rarely neutral.
Shadows have two qualities that most beginners overlook:
They lean cool. When sunlight (warm) is removed from a surface, the light that fills the shadow comes from the sky, which is cool and blue. That makes most outdoor shadows shift toward blue or violet.
They pick up reflected color. A shadow cast across a red tablecloth will have some red in it. A shadow on grass will have a touch of green. The local color of the surface influences what you see in the shadow area.
Fix both of these by mixing shadows from color rather than from pre-mixed grey or straight black.
How to Mix Shadow Colors in Watercolor
A reliable starting point: take the local color of the surface receiving the shadow, then shift it toward a cool blue or violet by mixing in a small amount of ultramarine blue or dioxazine violet. Darken it by adding more pigment and less water, not by dropping in Payne's grey (which cools and dulls simultaneously, which can feel deadening).
Here are a few practical mixes for common surfaces:
| Surface | Base color | Shadow shift |
|---|---|---|
| White or light grey | Ultramarine blue | Add a hint of rose or violet |
| Warm skin tone | Yellow ochre | Add ultramarine + small rose madder |
| Green foliage | Sap green | Add ultramarine or indigo |
| Sand or tan ground | Raw sienna | Add ultramarine blue |
| Red or orange surface | Cadmium red / pyrrol orange | Add dioxazine violet |
The ratio depends on how dark the shadow needs to be. Start with a mixture that looks slightly too light on your palette, shadows often dry lighter than they appear wet, and it is easier to add another glaze than to remove a shadow that is too dark.
Understanding how to work from light to dark values will help you decide where the shadow sits in your value scale before you mix anything.
Edges: Hard, Soft, and Lost
Edges inside a shadow are as important as the color. Shadows have different edge types depending on what is casting them and how far the shadow falls from the object.
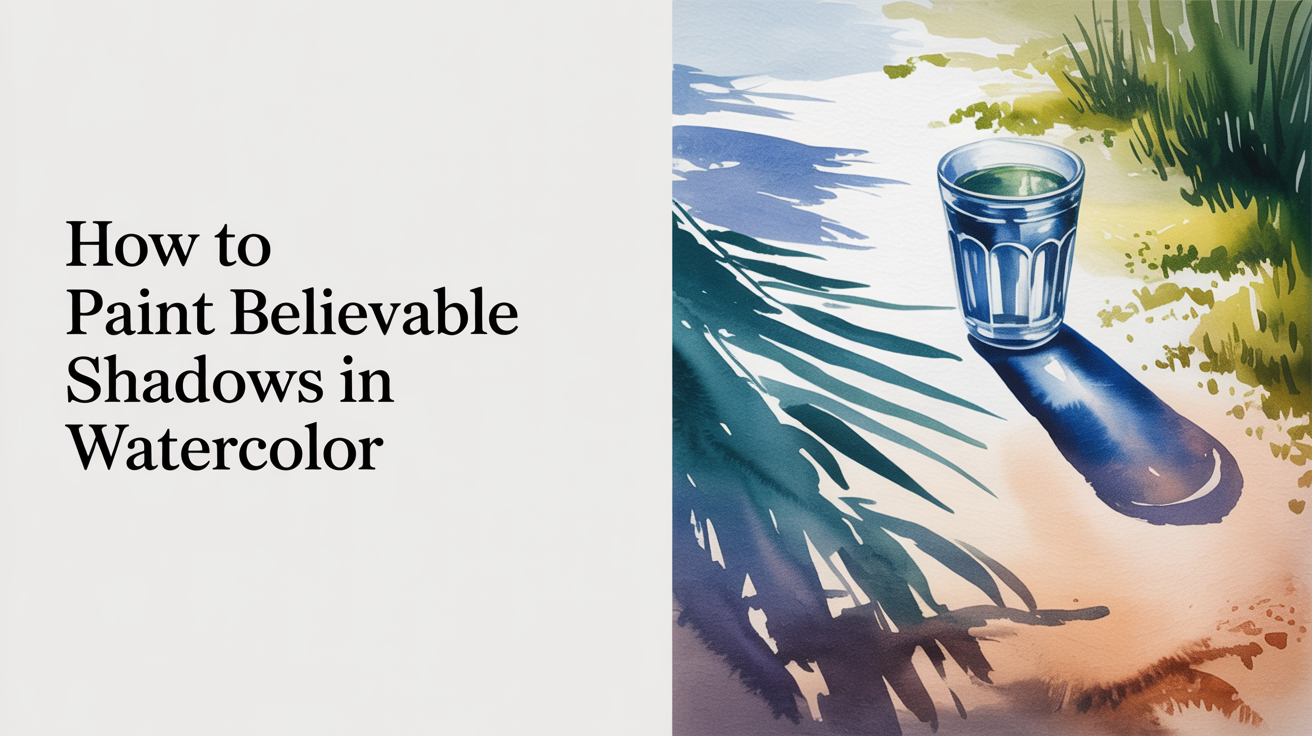
Hard edges appear where the shadow meets a light surface abruptly, particularly right underneath an object sitting on a flat surface. The contact shadow, the darkest, sharpest part, always sits closest to the object.
Soft edges appear farther from the object as the shadow tapers off. The further a shadow travels from its source, the softer and lighter its edge becomes.
Lost edges happen when a shadow falls across a surface that is also in shadow, or when two dark areas meet. At those junctions, you can let the paint run together wet-in-wet and the edge will disappear naturally.
To get a soft edge in watercolor, paint up to the shadow boundary while the first wash is still damp and let it bloom. To get a hard edge, wait until the previous wash is completely dry before painting the shadow shape.
Cast Shadows vs. Form Shadows
These two shadow types solve different problems, and mixing them up is why beginners struggle.
Form shadows are the dark side of an object itself, the part not hit by the light source. They are gradual and curved, following the object's surface. A sphere in direct sunlight has a light side, a mid-tone transition, and a form shadow that wraps around the back.
Cast shadows are thrown onto another surface by the object blocking the light. They are usually sharper at the base (close to the object), paler and softer at the far edge, and they echo the shape of the object loosely distorted by the angle of the light.
Both appear in most still-life and landscape subjects. Painting both types keeps a scene from looking flat. The form shadow shows the object's volume; the cast shadow anchors it to its surface.
A Simple Practice Exercise
Before painting shadows in a full scene, spend ten minutes on this drill:
- Paint a simple round shape (circle) in a mid-tone warm color. Let it dry.
- Mix a shadow color using the method above: local color plus a cool shift.
- Paint the form shadow on the lower-right third of the circle (or wherever suits your imagined light source). Soften the inner edge wet-in-wet so it blends smoothly.
- Paint a cast shadow to the lower right of the circle. Keep the edge near the circle hard, and lift or thin the wash as it moves away.
- Step back and check: does the sphere look like it is sitting on a surface?
This exercise reinforces the logic faster than painting a full scene because you have only two shapes to manage. Repeat it in different light directions until mixing and placing shadow color becomes automatic.
Saving the lightest lights before you paint any darks is a related skill worth building at the same time. How to save the white of the paper in watercolor covers the masking and planning approaches that make the light areas in a painting feel intentional rather than accidental.
Planning Shadows Before You Paint
Placing shadows without planning often leads to inconsistent light direction, where some shadows go left and others go right without a clear light source. A short value study before you start will catch this.
How to do a quick value study before you paint walks through a simple thumbnail approach that takes five minutes and prevents the most common shadow placement mistakes. Sketch just three values: light, mid-tone, and dark. The shadow areas are usually in the dark zone, so you can map them out in pencil before loading any paint.
Once you know where the shadows land, you can also consider their shapes. An interesting shadow shape can become a compositional element in its own right, especially in a strong sidelit still life or a sunny street scene.
Frequently Asked Questions
Should I use black paint for shadows in watercolor?
Black paint tends to deaden watercolor shadows and can look muddy on paper. Most experienced watercolorists mix shadow colors from transparent pigments instead. Ultramarine blue and burnt sienna mixed together produce a rich, adjustable dark that leans warm or cool depending on the ratio, and it is far more responsive than black straight from the tube.
Why do my shadows look grey and flat?
Grey shadows usually mean the color is not connected to either the light source or the surface. Try warming or cooling the shadow mixture depending on the scene, and make sure you are basing the shadow color on the surface it falls across rather than using a fixed shadow tone for every situation.
How dark should a shadow be in value?
It depends on the scene, but a useful rule of thumb: shadows are rarely as dark as the deepest dark in a painting. Leave that darkest value for the small accents, such as the contact shadow right at the base of an object. The broader shadow area usually sits one to two steps darker than the lit surface.
Can I glaze a shadow on top of a dry wash?
Yes, and it is often the most controllable approach for beginners. Paint the base color of the surface, let it dry fully, then glaze a transparent shadow mixture on top. The underlying color shows through and warms the shadow naturally. Use a transparent pigment for the glaze, such as ultramarine blue or quinacridone violet, so the layers stay luminous rather than chalky.
How do I fix a shadow that looks too dark?
Act quickly while the paint is wet by lifting with a damp brush or clean damp tissue. Once dry, you can lift slightly by dampening the area and blotting, but watercolor shadows rarely lift back to white paper completely. The more practical fix is to plan values before you paint so the shadow is the right depth from the start.