Subjects & Projects
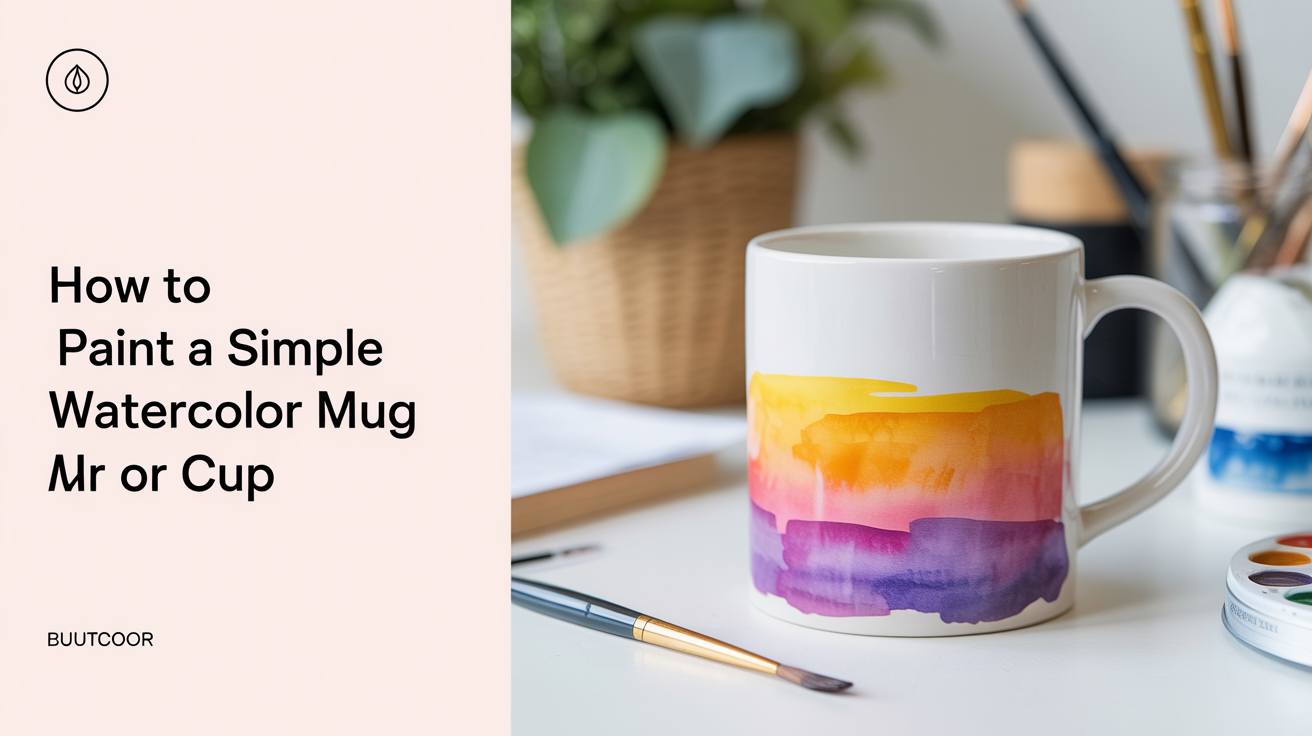
How to Paint a Simple Watercolor Mug or Cup
Paint a ceramic mug in watercolor: see the cylinder form, place light and shadow, reserve highlights, and add a cast shadow in one short session.
A ceramic mug is one of the best first still life subjects you can choose. It sits still, it has a clear light side and shadow side, and its handle gives you a chance to practice a crisp wet-on-dry edge without committing to anything complicated. You can finish the whole painting in under an hour, and the skills you practise here carry directly into more ambitious work later.
This guide walks you through the process step by step, from drawing the basic cylinder to laying a cast shadow on the table. All you need is a limited palette of three or four colors, a sheet of cold-press paper, and a couple of brushes.
Seeing the Mug as a Cylinder
Before you touch paint, look at your mug for a moment with fresh eyes. The body is a cylinder. The rim at the top is an ellipse, and the base is a slightly wider ellipse. The handle is essentially a bent rectangular strip attached at two points.
Getting the ellipses right is the most important drawing step. An ellipse is a flattened circle, and the degree of flatness depends on how far above or below eye level the rim sits. If the mug is at table height and you are looking slightly down at it, the ellipses will be fairly open (wide and rounded). If the mug is at eye level, the ellipses flatten almost to a line. Sketch both ellipses lightly in pencil before drawing the sides connecting them.
A common mistake is drawing the rim too flat or making the two sides of the mug perfectly vertical. Cylinder sides taper very slightly inward from base to rim on most mugs. Observe your specific mug and draw what you actually see rather than what you expect to see.
Once the pencil drawing feels solid, you are ready to paint.
Laying the First Wash: Light Side and Shadow Side
The body of the mug has a light side, a mid-tone, and a shadow side. On a cylinder, these transitions are curved and gradual rather than abrupt. You are not painting three separate zones with hard edges between them; you are painting a single wash that shifts in value as it moves around the form.
Start with a clean, damp brush and wet the entire body of the mug, staying inside your pencil lines. Working wet-into-wet, drop your lightest value in on the side closest to the light source and let it blend toward a mid-tone in the center. On the far edge from the light, drop in a darker mix of the same color. The paper's dampness will carry the pigment smoothly across without visible streaks if you work quickly.
For a warm-toned mug, try raw sienna or a diluted burnt sienna as your base color. For the shadow side, mix in a small amount of its complementary color (a violet or blue-violet works well) rather than simply adding more of the same pigment. A pure pigment deepened only with itself tends to go flat and muddy. Adding a complementary color keeps the shadow interesting and visually separate from the light side. For more detail on this, see the guide to how to paint believable shadows in watercolor.
Leave a thin sliver of unpainted paper along the very top of the rim. That preserved white will read as the highlight catching the light on the curved edge.
Let this first wash dry completely before moving on.
Reserving Highlights and Painting the Handle
Once the body wash is dry, you can see how much value you have and decide whether a second layer is needed to deepen the shadow side. If yes, apply a second wet-on-dry wash only over the shadow area, letting it dry again before touching anything else.
Now for the handle. This is where wet-on-dry becomes important. The handle is a separate, smaller form, and it needs relatively crisp edges to read clearly against the body of the mug. Load your brush with a mid-value mix, paint the handle in one confident stroke or two, and stop. Do not go back in while it is wet or you will get unintended blooms.
Within the handle, there is usually a small highlight on the outer top edge (where the light hits the rounded surface) and a shadow on the inner curve (where it bends back into darkness). You can reserve the outer highlight by simply not painting that thin strip, or you can mask it beforehand with a small piece of masking fluid applied with an old brush. The inner shadow can be added with a second small stroke once the first is dry.
The connection points where the handle meets the mug body deserve a slightly darker value to show the visual weight of the attachment and the small shadow those joints cast on the mug surface.
For a broader look at when to let edges stay soft versus when to sharpen them up, the article on soft vs hard edges in watercolor and when to use each explains the reasoning in more depth.
Adding a Cast Shadow to Anchor the Mug
A mug floating in white space looks unfinished. A cast shadow on the table surface below and beside the mug tells the viewer exactly where the object is sitting and gives the painting a sense of ground.
Cast shadows from round objects are elliptical at the base and fan out away from the light source. The edge of the cast shadow closest to the mug tends to be harder and slightly darker; the far edge softens as the shadow stretches away.
Mix a cool shadow color: a blue-violet or a neutral grey leaning violet works for most lighting conditions. Apply it with a wet-on-dry pass along the table plane, starting darker and tighter at the base of the mug and gradually lightening and widening as you move away from it. Leave a sliver of white between the base of the mug and the start of the cast shadow, which suggests the reflected light bouncing off the table under the rim.
You can also suggest a very thin line of reflected light on the darkest part of the shadow side of the mug itself (the far edge). This "reflected light" effect is subtle but makes the cylinder feel three-dimensional rather than flat. Keep it lighter than the mid-tone but darker than the light side.
If you want to go further with this kind of subject, an easy watercolor still life for beginners covers how to set up a simple arrangement with multiple objects and approach it with the same limited-palette method.
Frequently Asked Questions
What colors do I need to paint a ceramic mug? Three is enough. A warm mid-tone for the local color of the mug (raw sienna, burnt sienna, or a muted ochre), a cool blue-violet for the shadow side and cast shadow (ultramarine blue mixed with a little alizarin crimson works well), and optionally a slightly different warm to vary the light side. You do not need the color of the mug to be literal; the light and shadow relationships matter more than matching the exact hue.
My shadow side looks muddy. What went wrong? Muddiness usually comes from two things: mixing too many pigments together before the wash is dry, or going back into a wet wash with more pigment after it has started to set. For shadows, mix your color on the palette first until it is right, then apply it in one pass. Adding a small complement (a touch of violet into an orange-based shadow, for example) is fine as long as you do it while the wash is still wet enough to blend.
How do I keep the highlight on the rim? The simplest way is to leave it unpainted from the start. Watercolor is transparent, and once you paint over the white paper you cannot fully recover it. Decide where your highlights are before you begin, and just skip those areas. If your wash accidentally covers a highlight, a small piece of damp paper towel pressed immediately onto the wet paint will lift some pigment back out, though it rarely restores a clean white.
Should I wet the handle area when painting the mug body? No. Keep the handle area dry when you lay the body wash. This gives you control over the handle as a separate form with its own edges. If you wet the whole mug surface at once, your body wash will bleed into the handle unpredictably. Paint the body, let it dry, then paint the handle separately.
Can I use a white mug or does the color matter? A white mug is actually a great choice for a first attempt. White ceramic is almost entirely made up of reflected light and cast shadows, so the painting becomes a pure exercise in value and temperature rather than local color. Use a pale blue-grey for the shadow side and a very warm off-white or pale raw sienna for the light side. The contrast will teach you a lot about how light reads on a simple form.