Subjects & Projects
Loose Watercolor Flowers: An Easy First Project
Learn to paint loose watercolor flowers in simple steps. A beginner-friendly project with real tips on color, brushwork, and staying relaxed.
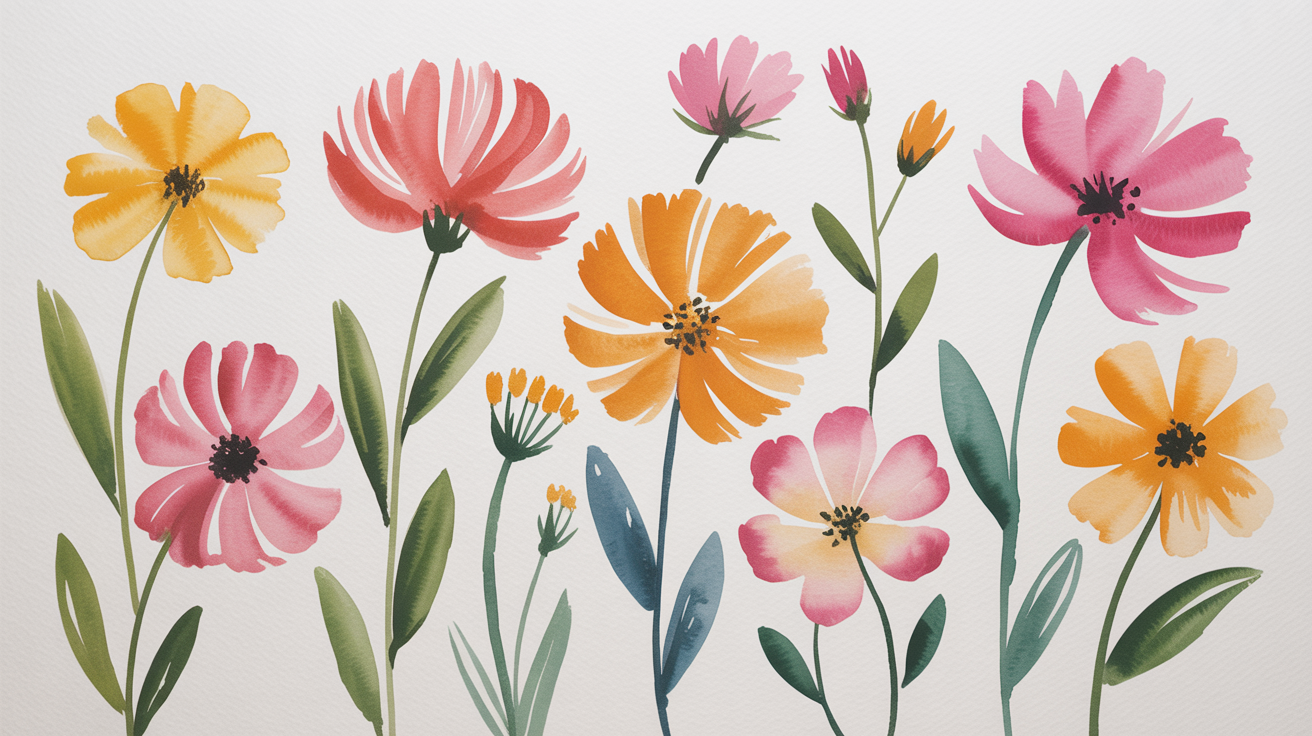
Loose watercolor flowers are the single best first project for a beginner. They're forgiving, they look beautiful even when imperfect, and painting them teaches you nearly every core skill at once: wet-on-wet blooms, layering for depth, and the crucial habit of letting things dry before you touch them again. This guide walks you through a small bouquet you can finish in an afternoon.
What "loose" actually means
"Loose" does not mean sloppy. It means you let the paint do some of the work. Instead of outlining every petal and filling it in like a coloring book, you drop color onto wet paper and let edges blur. You suggest a petal rather than drawing it. The result looks fresh and alive in a way that tight, controlled painting rarely does.
This approach is genuinely easier for beginners because it removes the pressure to be precise. A petal that bleeds into the one next to it is not a mistake. It is watercolor doing what watercolor does.
Supplies you need
You do not need much for this project.
- Paper: 140 lb (300 gsm) cold-press watercolor paper, cut or torn to about 8x10 inches. Cold-press has a slight texture that holds paint beautifully for florals. Hot-press is too smooth for loose work.
- Brushes: A size 8 or 10 round is your main tool. A size 6 round for smaller details. A 1-inch flat brush is useful for background washes but not essential to start.
- Paints: Six colors will get you through dozens of projects. For this bouquet: quinacridone rose (a transparent, glowing pink), ultramarine blue (granulating, slightly sedimentary), cadmium yellow or hansa yellow (warmer hansa, cooler cadmium), sap green, burnt sienna, and Payne's grey for darks.
- Two water jars: One for rinsing, one clean for mixing. Keeping them separate matters more than people expect.
- A palette with wells: Any ceramic palette or a butcher tray works. Plastic palettes sometimes cause paint to bead up.
That is genuinely everything. Resist buying more until you know what you actually need.
The four colors that carry this project
Before you start painting, mix up these four puddles on your palette. Use more water than you think you need.
| Color | Mix | Consistency | What it does |
|---|---|---|---|
| Warm pink | Quinacridone rose alone | Milky (thin) for outer petals, tea (medium) for centers | Main flower color |
| Soft lavender | Quinacridone rose + a touch of ultramarine | Milky | Petal shadows and variation |
| Yellow-green | Sap green + hansa yellow, 2:1 | Tea | Fresh leaves and stems |
| Deep green | Sap green + burnt sienna or Payne's grey | Coffee (rich) | Dark leaf accents, veins |
Keep a scrap of the same paper nearby and test every color before it touches your painting. Watercolor dries roughly 20 to 30% lighter than it looks wet, so your milky pink might look nearly white in the jar and land as a pale blush when dry. That is normal.
How to paint loose watercolor flowers, step by step
This is a simple bouquet: three large blooms and a handful of leaves, clustered loosely. Work on one flower at a time so you can control the wet-on-wet timing.
Step 1: Wet the first petal shape
Load your size 8 round with clean water and paint a rough petal shape, maybe the size of a quarter. Keep it simple: a slightly curved teardrop. The paper should look shiny but not pooled with water.
Step 2: Drop in color while it's wet
While that petal is still wet, load the same brush with your milky quinacridone rose. Touch the tip to the wet area near one edge of the petal. The color will bloom outward on its own. Do not chase it or scrub. Set the brush down and watch what happens.
This is the core skill of loose watercolor flowers. You are nudging paint, not placing it.
Step 3: Add a second color at the center
While the first petal is still wet, switch to your lavender mix or a slightly stronger pink and touch it to the base of the petal, where a real petal would be darkest. The two colors will blend in the wet paper. If the edge of the bloom stays sharp where you want softness, add a tiny brush of water to open it up.
Step 4: Paint the remaining petals, leaving gaps
Add four to five more petals around an imaginary center point. Leave small white gaps between petals. These gaps keep the flower from looking muddy and give it air. Some petals can overlap slightly, but let each one dry before you add a neighbor if you want a clean edge between them. If you want them to bleed together, work while everything is still wet.
A round bloom with five to six petals is enough. Resist the urge to keep adding.
Step 5: Suggest a center while still slightly damp
When the petals are just barely damp (not wet, not dry, that tricky in-between stage), pick up a small amount of burnt sienna or a deep pink on your size 6 brush and dot a rough circle at the center of the flower. The color will spread a little but not too much. This gives the flower a focal point without overworking it.
Let the first flower dry completely before starting the second.
Step 6: Repeat for two more flowers, vary the angle
Paint two more blooms using the same method, placing them so the three flowers form a loose triangle rather than a straight line. Tilt one flower slightly, as though it is nodding. Vary your colors: try a cooler, more lavender petal for one flower and a warmer, more orange-pink for another using a touch of burnt sienna in your quinacridone rose.
If you get a hard edge you did not want, let it dry fully and soften it with a damp brush in a later layer. Never scrub a wet painting.
Step 7: Paint the leaves
Leaves are where beginners often spend too little time, but they are what makes a bouquet read as a bouquet. Load your size 8 round with the yellow-green mix and paint simple, slightly pointed leaf shapes around and between the flowers. Vary the angle and length. Some leaves can tuck behind a flower petal.
While each leaf is still wet, drop in a darker green (your sap green plus Payne's grey mix) near the base or along one edge. The two greens will blend and give the leaf form without any outlining. For a crisp center vein on a dry leaf, use the tip of your brush with the dark green mix and pull a single quick stroke.
Leaves are good practice for the same wet-on-wet technique as the petals. If they go wrong, they are also the easiest things to paint over once dry.
Step 8: Add a second layer sparingly
Once everything is completely dry (give it 20 to 30 minutes, or use a hair dryer on low), look at the painting as a whole. If a flower needs a slightly deeper shadow at its center, add it now with a slightly richer mix of your pink or lavender. If a leaf needs a darker accent, add it now.
Do not add more than one or two small details. The most common beginner mistake at this stage is overworking. Loose watercolor florals earn their character from the layers that are already there.
Common problems and simple fixes
Even a small bouquet will throw a few surprises at you. Here is what usually happens.
- Paint pooling in the center of a wet petal: tip the paper slightly so the puddle runs to one edge, then dab the excess with a dry brush or a corner of paper towel.
- A hard edge where you wanted a soft one: this is called a "cauliflower" or bloom (sometimes called backrun). It happens when you add wet paint to an area that is partially dry. It is not always bad. If you dislike it, let the area dry completely, then glaze a thin wash over it.
- Colors turning muddy: too many colors mixed together, or painting into a wet area before the first layer dried. Stick to two colors per petal, maximum three.
- The flower looks flat: add one small dark accent at the center. That single value change creates the illusion of depth.
For background technique that can really set off a loose floral arrangement, read the approach in how to paint a simple watercolor sky and clouds. A pale sky wash behind the bouquet, dropped in while everything else is dry, can give the composition space and light.
Building a small skill base from here
Loose florals improve fast with repetition. Paint the same three-flower bouquet five times on scrap paper before you move to a "real" piece. Each pass teaches your hand something your brain cannot.
From flowers, the natural next step is how to paint watercolor leaves and greenery, which covers a wider range of leaf shapes, negative painting, and how to handle complex overlapping foliage. The techniques carry over directly.
You can also experiment with color temperature. Swap quinacridone rose for cadmium yellow and sap green for cerulean blue and paint a simple field of yellow flowers with blue-green stems. The same method, completely different mood. Once you understand wet-on-wet, the color combinations are yours to explore.
Frequently asked questions
Do I need to sketch the flowers in pencil first?
You can, but a very light pencil sketch only. Use a hard pencil (2H or HB) and press gently. For loose watercolor flowers, a heavy pencil sketch tends to make you color inside the lines rather than paint freely. Many painters in this style skip the sketch entirely after a little practice and just paint directly. Try both and see which feels right to you.
Why do my colors look so much lighter when the painting dries?
Watercolor dries 20 to 30% lighter than it appears when wet. This is one of the first things beginners need to calibrate for. Mix your colors richer than you think you need, especially for petals. Testing on a scrap of the same paper and letting it dry before you commit to the painting is the best way to train your eye. After a few sessions, you start to predict it without thinking.
My petals all bleed together into one blob. What went wrong?
The most likely cause is that you added the second petal before the first one dried, or you used too much water. For separated petals with soft edges, let each one dry for a minute or two before painting the neighbor. For a fully merged, monoprint-style bloom, wet the whole flower area first and drop all the petals in at once. Both are valid approaches; they just produce different results.
Can I use student-grade paints for this project?
Yes, especially while you are learning. Student-grade paints have more filler and less pigment, so the colors are less saturated and may not granulate as beautifully, but the techniques work the same way. When you are ready to compare, buy one professional-grade tube of quinacridone rose alongside your student set and paint the same petal with each. You will see the difference clearly. Upgrade gradually rather than all at once.
What should I paint after I finish this project?
Try the same bouquet on a different paper: if you used cold-press, try hot-press for a smoother bloom, or rough-press for more texture. Or change the color scheme entirely, painting blue and violet flowers with warm ochre leaves. When color and composition feel comfortable, try adding a simple background wash before the flowers dry to see how the edges interact. If you want to branch out to landscapes, the wet-on-wet skills you built here translate directly to how to paint a watercolor sunset for beginners.